WiFi-You Have Mail
Introduction
This project does a relatively simple job and has been purposely kept that way to encourage further experimentation. By using ByPic the user is able to modify the code simply by modifying the existing and downloading again no programmer is needed.
In case you haven't watched the video the device will get the last mail received from a given inbox and display the date, who its from and the subject line. It is completely independent of a host PC but does require permission to connect to an existing Access Point.
Requirements
- Address and permissions for an IMAP server, you will have this if you use email, see below
- Parts needed to construct the project
- A PC running windows to configure the ESP8266
IMAP
Email is something most people have and take for granted. Using an email client (i.e Thunderbird, Outlook) it so established that most do not have a clue about how the email gets to the client in the first place. I must confess that if last week somebody asked me this question I would not be able to answer, it is so long ago that I have had any dealing with IT management. I had not set an email box up for years and so completely forgotten about the protocols used.
As the chapter head suggests the receiving protocol for emails is IMAP, there is also POP but we will not be using that here. When you sign up with an email provider you will be given the address of the IMAP server, this is an internet address just like any other. It is possible to 'telnet' to the address and have a manual IMAP session, see the resources section for the link to how this is done.
To complete this project you will need to obtain the address and port number * of the IMAP server. This is given to you by the provider and will be stored in the email client under settings. In Thunderbird for example this comes under Settings then Server settings. You will also need an email address e.g. (me@info.com) and a password for that address.
* Use port number 143 initially as we have no decryption software, higher port numbers are normally more secure and thus require an extra layer of software.
Hardware
The project uses a ByPic microcontroller, an LCD display and an ESP8226. The ByPic was chosen because the program can be easily modified by the user (requiring no specialist tools). The whole point of this project is that it will run independently of a PC, just needing a power supply.
To complete this project you will need to be able to solder, there are quite a few wires at the back of the BP1
Parts list
You can get the parts separately or for convenience I have put a kit of parts together here. To complete the kit some soldering skills are required. The kit consists of:
- BP1 with USB
- 16x2 LCD display
- ESP8266
- 1 x 16 way pin head for the LCD
- 1 x 16 way socket, 2 x 4 way sockets
- 1000uF capacitor
- Trimmer
- Some wire for making connections
 Click to enlarge
Step 1: The first thing to do is to build up the BP1, full detailed instructions are here, click on the Construction Details link. It is also important that once built you make sure it is working properly before proceeding. You must be able to get the sign on screen.
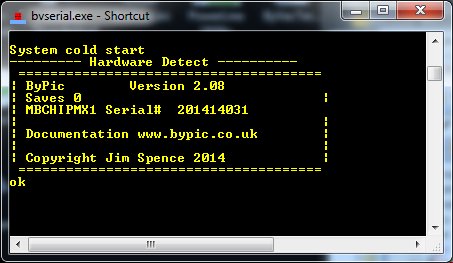
Make sure you have something like this before continuing. Details of the serial terminal to use are in the instructions link.
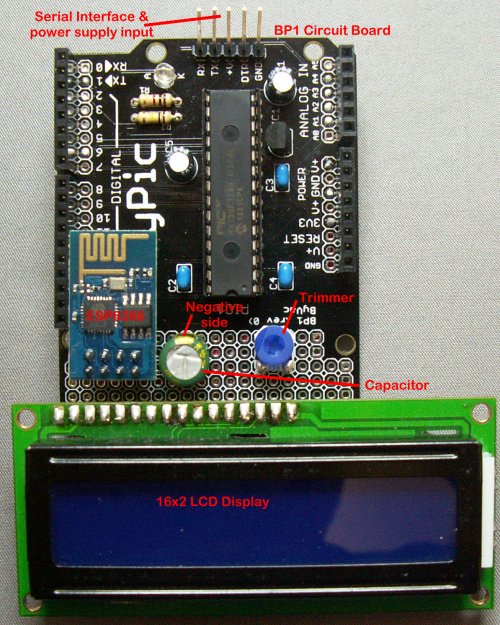
This is the completed project, top side.
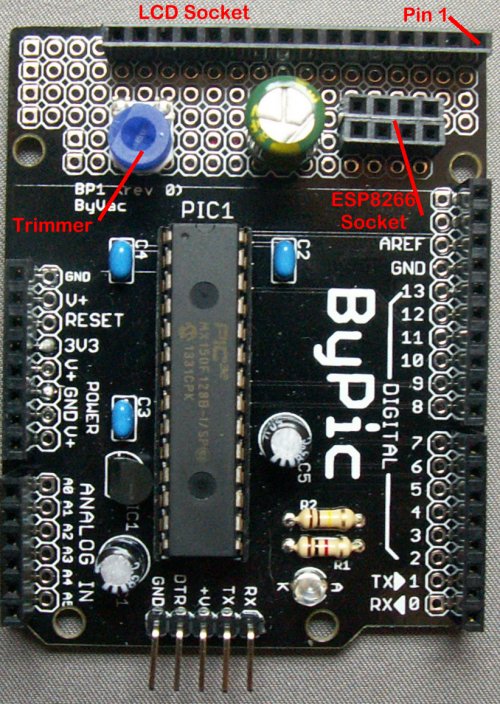
Step 2: Solder all of the sockets in place, the 2 off 1 x 4 sockets are soldered next to each other to form a 2 x 4 socket for the ESP8266, solder the trimmer and capacitor.
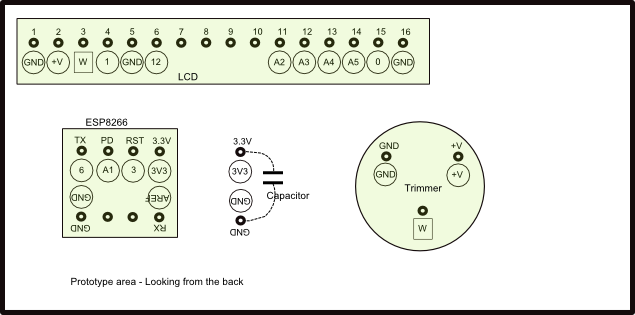
This is the back of the prototype area, to make things a bit easier, the values in the circles refer to the markings on the BP1 PCB. So for example pin 4 of the LCD will go to the socket marked 1 on the BP1 PCB and pin 12 of the LCD will go to the socket marked A2 on the BP1 PCB. This is looking at the underside and so you can see that everything is reversed.
All you need to do is wire the pads marked with a circle to the name of the marking on the PCB. The pads next to the main sockets on the PCB are connected to the sockets and so these holes can be used as shown.
It may be better to take a few wires topside, the back will then not be as crowded?
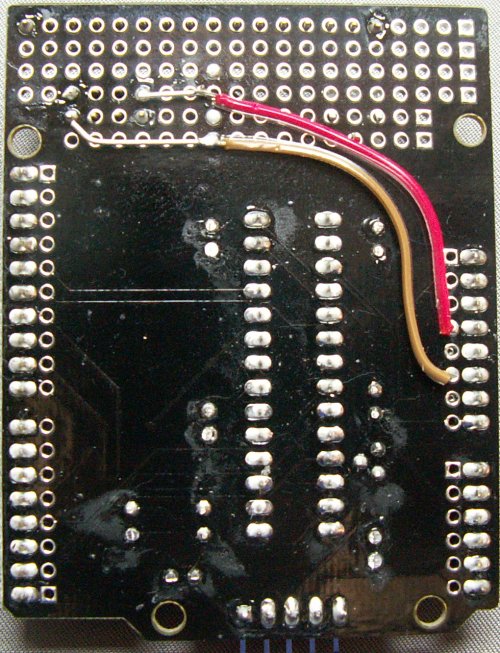
Beginning with the power (note the holes [pads]) next to the socket are connected to the socket.
Step 3: Start by wiring the power, the capacitor is in my case wired directly to the ESP8266, this is just for convenience as it is next to it. Make sure that the capacitor is the right way round!
Step 4: Wire the rest of the lines.

There are quite a few fiddly wires to solder in place so BEFORE inserting the ESP8266 and LCD into their sockets, power the board up and check that there is 5V at the LCD and 3.3V at the ESP8266. If you don't have a meter then double check the wiring, there will probably be a mistake.
Step 5: Solder the 16 way pinhead to the LCD display so that it will push fir into the socket
Firmware
With the wiring perfect, connect the USB to serial to get the sign on screen, you should be using the IDE by now. Load the ESP8266 firmware using the script below
http://www.byvac.com/mBlib/flb/Projects/yhm/yhm_MX150.script (for the MX150 IC - look on top of the chip)
http://www.byvac.com/mBlib/flb/Projects/yhm/yhm_MX170.script (for the MX150 IC - look on top of the chip)
To load a scrip: Copy the green URL by selecting it and the copy using CTRL+C, in the editor (IDE) menu>Scripts>Open URL in Clip, this will load the script file into the editor, then use the scripts menu again (menu>Scripts>BvSerial>Send All Script) or easier SHIFT+CTRL+R.
The script will take about a minute to load and will be complete when you see "Script complete". At this point on the black terminal screen type .r (dot r) and the ByPic will reset.
Now type esp_menu(), you will get a main menu thus:
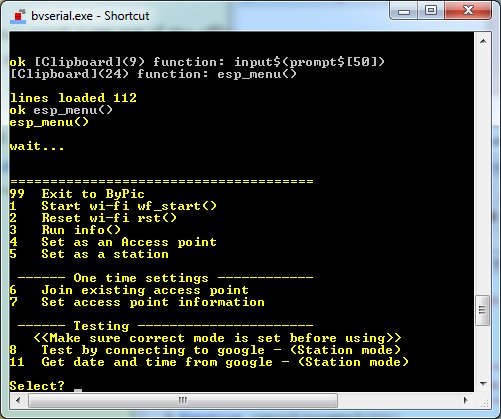
Use option 5 to set the device to be a station.
Use option 6 to join the network at your location.
Use option 3 and you should now have an IP address, this may take a few seconds.
If you have an IP address then test the set up by getting the current date and time (option 11)
Any problems at this stage will be due to either the wiring or not being able to connect to an existing access point. If the latter is the case then you will not see an IP address. Double check that you have entered the SSID and password correctly, if in doubt do it again.
Another possibility is that you may be out of range, but in practice I have an ESP8266 running very well that is about 20m from the AP and through 2 brick walls.
All being well the info screen should look something like this.
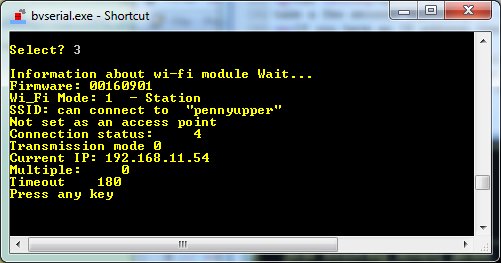
In this case the access point SSID is called "pennyupper" and that access point has given the ESP8266 and IP address of 192.168.11.54
The Email Application
Its now time to load the YHM application and save it so that the device will run stand alone. The firmware needs to know the IMAP server, port number, mailbox and password. These are stored as constants in the firmware itself.
http://www.byvac.com/mBlib/flb/Projects/yhm/yhm.bas (for the MX150)
http://www.byvac.com/mBlib/flb/Projects/yhm/yhm.bas (for the MX170)
Copy the above link (CTRL+C) and in the editor menu use scripts>Open URL in Clip, press okay.
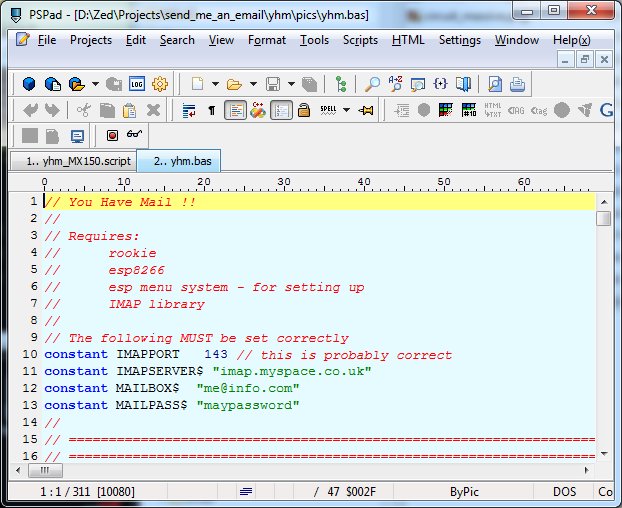
You will need to edit the 4 constant entries as shown in the above picture, put in your own details (probably best to keep the port as 143 even though your IMAP may use something else). There is no need to save this .bas file although you can save it locally if you want. Press F4 to get it on to the ByPic and type main()
The program should now run as expected. To get out of the loop press any key and then wait for the scrolling to finish.
Making it stand alone
For the MX170 simply type flsave("")
For the MX150, there is not enough room for all of the functions so get rid of the esp_menu as we don't need it now. Type .r (dot r) to reset the ByPic then type flclear(1). This will remove the last saved set of functions which was the esp_menu. Re-load the yhm.bas file again by pressing F4 and then type flsave("")
When the project is reset (.r) or powered up the program will run as there is a function called main() that has been saved to flash.
Further
We have an LCD connected to the internet, what else can we do with it? Some ideas:
- Display local Access Points
- Get Accurate date and time
- Get a news feed - stocks & shares?
- Connect to Twitter, Facebook for alerts.
Just some ideas, I have no idea how to do the last two but I am sure that a search on google would reveal the answer.
Resources
http://www.skytale.net/blog/archives/23-Manual-IMAP.html An excellent description of the IMAP protocol
Scripts and programs used
http://www.byvac.com/mBlib/flb/Projects/yhm/yhm_MX150.script (for the MX150 IC - look on top of the chip)
http://www.byvac.com/mBlib/flb/Projects/yhm/yhm_MX170.script (for the MX150 IC - look on top of the chip)
http://www.byvac.com/mBlib/flb/Projects/yhm/yhm.bas
http://www.byvac.com/mBlib/flb/Projects/yhm/yhmMX170.bas