BV4611
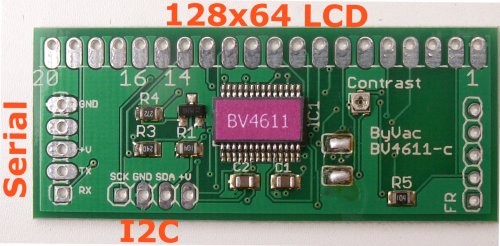
This display controller will convert a 128x64 display into an I2C OR VT100 display. It is specifically designed for the display on this site and these displays vary considerably so check your display against the data sheet before purchase. The special feature of this controller is that it can act either as a serial controller OR an I2C controller.
- Data Sheet
- KS0108B
- Attaching the controller
- VB program and text scripts - see read-me.pdf in zip file ** This is for the 192x64 display but the controller works in exactly the same way and so it is just the sizes that may need adjusting.
- Arduino Library This I2C library has been provided by Francisco Lopez, Thank you. ** This is for the 196x64 (BV4613) display controller but the BV4611 controller works in exactly the same way so apart form the size of the display it is completely compatible.
History
April 2013 release
Firmware Version 2.0 Jan 23, 2014
- Font 3 fixed, workaround for this was to use esc{x0 y0p first
- Command esc{g is now available for I2C
- Device reported 4613 for ID it now correctly reports 4611
- Removed the auto Baud detect. The device is now initially fixed at 9600 that makes it easier to initially set up. A new command is available for setting the Baud rate (esc[<br_code>b). Commands esc[?29a and esc[?29b have been removed as they are no longer needed.
Arduino
There isn't a serial library as such because the controller does most of the work. Here is an example:
#include <BSerial.h>

#define rxPin 5
#define txPin 4

BSerial bv(rxPin,txPin);

void setup()  {
  bv.baud(9600);
  bv.putch(13);
  delay(200);
}

void loop() {
char buf[40];
int j;
  bv.puts("Hello");

  while(1); // stop
}
The command set for I2C is EXACTLY the SAME as for serial, if you send a byte to the i2c bus it will appear on the display just as it would with serial so using the Arduino as an example to get 'fred' onto the display:Wire.beginTransmission(0x32);
Wire.write('f');
Wire.write('r');
Wire.write('e');
Wire.write('d');
Wire.endTransmission();
To clear the display:
Wire.write(27); // escape
Wire.write('[');
Wire.write('2');
Wire.write('J');
Wire.endTransmission();
Arduino Library This I2C library has been provided by Francisco Lopez, Thank you. ** This is for the 196x64 (BV4613) display controller but the BV4611 controller works in exactly the same way so apart form the size of the display it is completely compatible.
Windows
This is the demo program using python and the serial interface
http://www.byvac.com/download/py/bv4611/bv4611.py
http://www.byvac.com/download/py/bv4611/demo.py
The first one is a class that can be used with the display controller and the second one shows how to connect to the serial port and use the class.
Raspberry Pi (I2C)
The RPi has either I2C or serial interfaces. Because the RPi does not have any 5V tolerant pins then a 3.3V display must be used, these are hard to come by so the simple solution is to use the I2C interface.
Set Up From Scratch
This is a step by step guide on how to implement the BV4611 on the PRi using the I2C interface
1) Connect the display up to the Rpi, connect the SDA and SCL line first and then the power. The supply must be from the 5V line, this type of display will not work on 3.3V
2) The front of the display should now say "I2C Mode, ready.."
3) Install all of the I2C required files for the RPi - no I2C does not work out of the box it needs a bit or work. The details can be found here: [|http://www.pichips.co.uk/index.php/RPi_Software_Installation]
There are 7 things to do / install If you have an I2C system already up and running then it could be that only 'notSMB' requires installing. The details are in the above link.
4) Run i2cdetect -y 1 or i2cdetect -y 0 for older RPi's You should see something like:
     0  1  2  3  4  5  6  7  8  9  a  b  c  d  e  f
00:          -- -- -- -- -- -- -- -- -- -- -- -- --
10: -- -- -- -- -- -- -- -- -- -- -- -- -- -- -- --
20: -- -- -- -- -- -- -- -- -- -- -- -- -- -- -- --
30: -- -- -- -- 34 -- -- -- -- -- -- -- -- -- -- --
40: -- -- -- -- -- -- -- -- -- -- -- -- -- -- -- --
50: -- -- -- -- -- -- -- -- -- -- -- -- -- -- -- --
60: -- -- -- -- -- -- -- -- -- -- -- -- -- -- -- --
70: -- -- -- -- -- -- -- --
5) To make sure we are on the right track, run python and do the following:
>>> from notsmb import notSMB
>>> bus = nosSMB(1) // or for older RPi bus = notSMB(0)
>>> bus.i2c(0x34,[27,91,50,74],0)
The above will clear the screen
Download the following:
wget http://www.byvac.com/download/py/bv4611/bv4611_I_v2.py
wget http://www.byvac.com/download/py/bv4611/demo_I.py
Run the demo by python demo_I.py